Hanging Lake

Hanging Lake an incredible spot along I-70 south of Glenwood Springs that is perfect for an afternoon photo shoot. The whole of the experience is enjoyable and fits that rare category of being just the right amount of effort to be physically satisfying but not exhausting. The trail starts next to a stream and it is uphill continuously from there for 1.25 miles. Around you are tall trees in a deep narrow canyon, accompanying you for the duration is the stream that is fed by Hanging Lake and Spouting rock.

Once, with another photographer, I hit the trail an hour before sunrise just after a rather nasty little snow storm. To our somewhat sheepish horror, along the trail going in the same direction as us for about 1/2 mile were mountain lion tracks. We could see in the tracks where it came right up the stream at one point, presumably to get a drink.

While in the summer the trail is relatively easy footing that becomes rather less true in the winter. The trail becomes a well-worn rut in the deep snow that people smooth to a perfectly terrible sheen by sledding down in parts, making it rather maddening if you don’t have metal spikes on your shoes. The last little bit that curves around a tree sprouting up out of the rock, where they have rough steps and placed a crude and seemingly not quite substantial enough banister, can also be rather nervous in the winter if it has just snowed. The whole thing can turn into a nasty slick. Bring some snow-shoes with spikes for grip if you make a winter go!

Once you have made it up, you get a fantastic view of the canyon. The canyon faces south-east making morning light better than evening for photographing the lake, but even then the lighting is not fantastic. The lake itself is just past the view point and is rather unfortunately bridged by a wooden walkway to allow access to both sides of the shore. From the far side you can gain access to a rather tempting-looking downed tree that has a flat side facing up. I would avoid this unless you are truly the surest of foot. The water all times of year will be in the least brisk and that rather stable-looking tree is deceiving you. The further out you go on it the more you will find it is actually swaying back and forth from the flow of the falls making balance difficult.

Rather than falling into the lake at the wrong time of year and having a right bad time of it, make your way up to Spouting Rock behind the lake and further up the trail. You can go up from either side of Hanging Lake really, but the left is usually easier depending on the snow. In the summer either is fine. Up there you will find a stream that leads up to a small pool being fed by yet another waterfall. If you make your way behind these falls you will notice that below them out of the rock face is another much smaller water-fall that jets water. This formation can really shine in the winter when the upper part of the falls is frozen and just Spouting Rock is flowing.

There are no fees for the park and its proximity to I-70 makes it a popular spot to go. In my experience on early mornings you can enjoy the place by yourself until normal day hikers come and ruckus up the place.

For more photos of the area, refer to:
my flickr

Nature Tips #2 Cyan, Cobalt blue, and You messing with the Hue

<!-- /* Font Definitions */ @font-face {font-family:"Times New Roman"; panose-1:0 2 2 6 3 5 4 5 2 3; mso-font-charset:0; mso-generic-font-family:auto; mso-font-pitch:variable; mso-font-signature:50331648 0 0 0 1 0;} /* Style Definitions */ p.MsoNormal, li.MsoNormal, div.MsoNormal {mso-style-parent:""; margin:0in; margin-bottom:.0001pt; mso-pagination:widow-orphan; font-size:12.0pt; font-family:"Times New Roman";} table.MsoNormalTable {mso-style-parent:""; font-size:10.0pt; font-family:"Times New Roman";} @page Section1 {size:8.5in 11.0in; margin:1.0in 1.25in 1.0in 1.25in; mso-header-margin:.5in; mso-footer-margin:.5in; mso-paper-source:0;} div.Section1 {page:Section1;} -->

A quick and easy trick to make your skies more aesthetic:

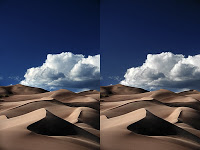
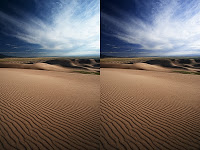
You may notice in some images the most amazing blue skies and you are not quite sure what it is about them that is so appealing. In some cases, it is lack of cyan. While this will not be a universal tip for skies, it works in many cases, particularly when you are creating darker images.

When you darken a sky in Photoshop, especially when using luminosity masking, you will get these kind of muddy dull cyan colors mixed in with the brighter areas of the sky, particularly when the sky is filtered by clouds and horizon haze. To fix this, open up a hue and saturation adjustment layer. Select Cyan from the menu and then move hue to the right until you have the desired sky. Then mask out the rest of the image to preserve the color balance you achieved on the raw import. A quick little fix like that can make or break an image.

Similarly this can be done when you have large bodies of clouds. In these cases I find simply de-saturating the cyan out of the clouds gives a better cloud color. Keep in mind when you are removing this cyan, what you are doing is creating an image that is closer to what we on some level believe it ought to look like. Clouds are black and white with shades of gray. Skies are a Parrish or cobalt blue. Similar things can be done with yellows to greens, though the adjustments are often more slight.

The point of this tip is to bring to attention the power of targeted hue adjustment. In the example images consider that sand is orange and the sky is blue which are complementary colors. If the sand was more yellow, I would consider targeting it to make more orange or targeting the sky to make it more magenta. This is applying basic but effective color theory to a static environment.

Next:

Shooting the Sun

Nature Tips #1 CPL – Circular Polarizer Lens Filter

This one is pretty basic. If you are going to be out shooting in nature, this is your single greatest tool.

Effects

What a CPL does is remove unattractive reflected or glare light. When light becomes reflected from a surface, it becomes polarized. By rotating the filter, you can block this light. This is how photographers remove reflections off of water, give foliage a more saturated feel, and create deep graduated skies.

reflection removal

In the example of the water running over the rocks you can distinctly see the effects of a CPL. Keep in mind that a CPL when set to block reflections reduced on average one stop of light.  Both of the images were shot at the same settings at show this loss of light in addition to removal of reflection.

wedges

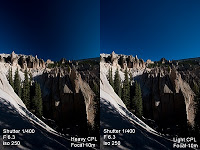
The CPL darkens the sky creating a strong and apparent graduation of tone (which is not only aesthetically pleasing, but can help create the illusion of a greater dynamic range) but this can be drawback in some cases, especially when shooting with a wide lens. In the example image you can see that the CPL creates a giant unpleasant wedge shape of tone in the sky.  The wedge becomes apparent at wider angles.  Keep in mind though, the angle of the graduation of tone is related to where the sun is in relation you. In the image the sun is rising and I am shooting the northeast. If I had been facing west, the sky graduation would go up and down and not an angle.

There are other drawbacks to using CPL, but they can be ameliorated somewhat by simply buying a nicer CPL. The problems will always be there, but the higher quality filters will suffer from it less and in less conditions. Cheaper filters can cause your images to be slightly blurry.

flare

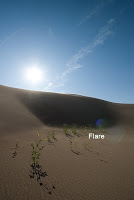
The worst problems appear when the sun shines directly onto your filter. Two things can happen; contrast loss and flare. When the sun shines onto your lens some of it is reflected off the filter, washing out the image. When the sun hits imperfections and the like or becomes split, it can flare. See the example image for flare. More expensive filters try to prevent this with different coatings and lens materials. Keep in mind that is may not be just the filter causing this, but the lens itself. Lenses like filters suffer from these problems.

Flare and contrast can be fixed in photoshop, but its better to get it right before hand. Every edit you make degrades the image slightly. Another two edits can make or break a sky from being a nice gradient to a banded mess of garbage.

A rare but terrible problem that can happen is when light reflected off the lens itself on the filter becomes strong enough to be visible in the image. This occurs under very certain conditions. I have only had it happen to me with CPL a handful of times out of the 20,000 or so shots I have made up to this point.

The bottom line is, buy a CPL as a tool it is essential for photographing nature even with its drawbacks and problems.

All the images presented with this are unedited raw images resized and labeled

Next will be Cyan, Cobalt blue, and You messing with the Hue

Further Examples

reflection removal

reflection removal