Nature Tips #4 Vignetting

Vignetting is a dirty but useful tool.  It allows you to place emphasis where you want after the photo has been taken, but using it is frowned upon.  The trick is to get away with it.  You tend see three versions, one in which it happens on its own, hipsters just blocking out the corners, and people using more discrete but still noticeable methods in photoshop.  Lens vignetting happens when the image circle created by the lens does not quite cover the sensor, causing fall off on the corners.  Usually these days you see it with older film cameras especially with the cheaper super wide zooms.  It can still happen with the new lenses, especially when filters are stacked.  Holgas and other such garbage by purposeful bad design tend vignette.  Hipsters love to recreate that effect in photoshop with sloppy black mask and gradient.  With more careful adjustments, the same emphasis on your subject can be achieved with more taste and discretion.

The intent on creating a vignette should be to change areas of contrast or to create a new contrast between the subject and the rest of the image.  The most basic way to do this is to create a level adjustment and then to mask out the subjected with a simple graduated mask.  By creating this mask, you create a contrast between subject and the rest of the image by placing the majority of the brighter tones in the subject.  Using a curve layer you can fully remove true whites from the rest of the image again drawing the viewer's eye by placing the stronger contrast in the center of the image.  The adjustments do not have to be entirely tone based, but can be based on color as well.  Look at the image of the ants, using the movie poster popular blue/orange contrast the image becomes stronger because it feels more dynamic because of the contrast.  The ants to begin with were already red orange and yellow dominant, so it was easy to create the contrast by making the area surrounding them green blue and purple dominant.  Further since the center of the subject is warm while the outside is cool the ants again become the focus.  As teh view's eyes are drawn to the warmer tones first.

Nature Tips #3 Shooting The Sun

Someone asked me last time for tips on shooting the sun, so random guy out there, here you go.

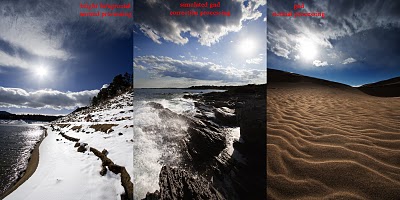
When you put the sun the image the trick is to get light between it and the rest of image balanced.  You can balance the light with a filter or some work in photoshop.  A graduated neutral density filter (referred to as a gnd from now on) fits this role just fine.  It still has all of the normal problems of flare and unwanted vignetting that can come with using filters, but it still does the best job.  If you do not have one, simply cannot get the shot without a prohibitive amount of flare, or the scene has too jagged of a horizon for a gnd, you can come back and fix it up in photoshop.

When you fix it up in shop, you can either simulate the effect of a gnd filter, exposure blend, or shoot HDR (which has its own problems).  There are limits to what you can do with a single exposure in terms of 'fixing it.'  First is that when you brighten, noise becomes apparent in the image but to expose the sky correctly you need to underexpose the ground.  Make sure you have histogram on in your display and highlight warning.  Take a test shot and then compensate (it's hard to meter well for this at first, so enjoy the advantages of digital as you learn to gauge it).  You are aiming for a shot that has the sun true white and reasonably small while retaining cloud detail.  The highlight warning will show you when you start clipping the highlights in the clouds, showing that you have taken in as much as you can get away.  When correcting like this, you have to pick and choose the foreground.  Silhouetted or shadow heavy foregrounds, like a forest, the dark side of mountain, etc do not work well, there is just too much correction and subsequent noise.  Well lit sand, brush, flat areas, and particularly snow work the best.  With snow, there often is hardly any correction at all.

Once you have the image in the raw importer, you should notice a little icon shaped like a filter and filter holder on the top menu bar, that is the gnd simulator.  Like with everything that has to do with exposure correction, if you can do it in the raw import, do it there.  The gnd tool allows you to draw the transition line creating a primitive gradient mask in the importer.  While the masking leaves something to be desire, you get a solid set of tools to edit with that draw on data from raw file allowing for less damaging changes to the image.  Once you have corrected the image import it and edit as normal.  Masking based on percent gray is the best way move on from here.  Tony Kuyper has a good tutorial on creating and using such masks over

here

.  For this image, I made brighter than 50% mask and brought down those tones in the sky while retaining the top ones with a curve.  Then a similar move with the shadows.  Next I added contrast to the moving water with a brighter than 50% mask lowering the mid-tones while brightening the highlights.  Finally I adjust the cyan to true blue in the sky and removed the yellow in the sky along the horizon.

Now suppose you were smart enough to bracket your shots and you have multiple exposures to work with you can blend exposures or do HDR now.  Pick two exposures, one for the sky and one for the foreground and open them in Adobe Camera Raw.  In ACR process the exposures with only the relevant area in mind.  Once you are satisfied, adjust for the color on which ever has the most information.  Then, in the upper left, select both images and click "synchronize."  In that menu select white balance to make the two match in color.  Leave checked anything else you want synced between the two images (like cropping or leveling the horizon).  With both selected, click open images.

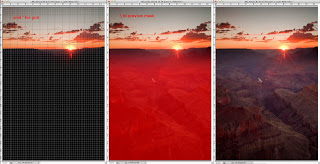
After opening the images select all of one of the images (for the example I selected the one set for the sky) and then copy paste it into the other file.  With the top layer (sky in the example) selected click on the layer mask button.  Into the mask were going to make a gradient, to make sure it is level you will want to turn on your grid lines (hot key cmd ' on mac).  The gradient tool will auto snap to these lines.  Usually to get a gradual enough change you will want the gradient to cover up a fair portion of both the ground and sky.  What will look best will be different for each image.  In the example image you can see the placement of my mask in red.  On the right is the final blend, from here you can continue to edit as normal.

Next:

How to vignette not like an idiot hipster

El Dorado Canyon

El Dorado Canyon is a nice but popular State Park located just inside the front range between Denver and Boulder.  Nearby is the southern half of Boulder Mountain State Park and Flat Irons Vista both of which can make heading over to the area worth your time.  By being so close to Denver and Boulder near H-36 it is an excellent evening hike if you are in the mood for less driving (from Denver) and a laid back walk.  There are three trails in the park, one that goes up to the foundations of an old hotel and for an overlook of the continental divide (plagued by trees, but what view isn't?), one that runs by the north side of the stream, and a third that provides access to the western side of the park leading near the Walker Ranch and even further west Gross Reservoir area.  The western part of the park actually caught on fire back in '09 as explained in a

previous entry

.

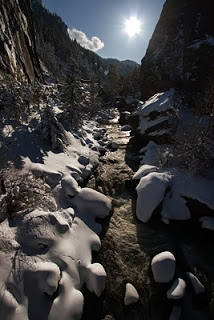
The park consists of a impressively sheer faces leading down into a rather charming steam that cascades occasionally through out the eastern half of the park.  In the summer the place becomes a solid green sprinkled with purple flowers while in the winter the whole of the park enjoys the edge of mountain snows.  The snow in the winter can become quite deep and it does get the mountain blizzards that can make driving sketchy, but every time I have gone out in such weather I was only chap in the park besides the rangers.  More for than just the solitude, the park really shines photographically at this time as it hides much of the human impact, covers the problems with the sky, and can make for simply gorgeous textures on the mountain faces that will not last the first direct sunlight on them.  During the winter excellent ice forms throughout the stream and over in areas at times.  I would never test this ice to walking over it though.  Along the sides where there is less flow you might be able to get away with it but the stream remains active all year making center ice always questionable.  In the spring, particularly during storms the flow becomes impressive.

Photographically I have always found the park to be frustrating under normal weather.  Effective evening and morning light is difficult.  The stream bends back and forth so much that light becomes blocked quickly often leaving one side of the stream completely unlit (see the first photo).  Further I have never had good luck with clouds here either.  I don't know what it is about the spot, but it is almost always all or nothing useful. For those reasons, I prefer the park during winter storms for photography.

As one would imagine, the park can become very busy or even full on summer weekends while at all times during the week it is common to find at least one face obscured by climbers practicing on its convenient faces.  During winter all of that disappears, usually a handful of hikers will be out on the forested part of the trails leaving the stream and mountains free of distractions for photographing.

More photos of the area, refer to my:

flickr